
Posting on social media, specifically Instagram is a huge part of our society today. For our final project, we are going to teach our learners how to post on Instagram. Below, we have multiple sources of learning materials that range from a strategic lesson plan that would be utilized to teach, infographics and a video with verbal and visual demonstrations. Our goal is to fully demonstrate the posting process in an engaging way. Utilizing the techniques we have learnt throughout the class, as well as the learning principles to create a comprehensive lesson.
To begin we created a lesson plan organizing our ideas and goals for the learners. Mapping out the different areas that multimedia would assist the lesson. Through this we edited ourselves to include a wider variety of multimedia content, and included a way for learners to deliver feedback to us. Creating a better dialogue between the creators and learners and focusing on including the multimedia principles.
What we have created for our learners demonstrates active learning and promotes engagement. This is evident through our interactive assignment because the learners are required to use their own device to create the desired outcome (ie: Instagram post). It is also a personal assignment because the learners have the freedom to choose to post anything that they like. This makes the task less stressful and more engaging. Adding a personal element both within the lesson through our own experiences with Instagram connects the learners with the content and provides an opportunity to relate the content with their daily lives. Additionally, the task being assigned to the students is a form of social interaction. This is one of the benefits to social media, it allows the users to engage with others directly from their phone. Lastly, the video with the demonstration and voice over contains multiple different learning principles, ensuring its efficiency for teaching a new task.
A comprehensive list of the principles we followed, as well as an explanation as to how is below:
The signalling principle is the idea that people learn better when cues are added that highlight the key information and its organization. This is evident in our infographic because of the clip-art, bold titles and short descriptions. It is easy for the learner to follow while being visually appealing.
The segmenting principle is the idea that people learn better when extraneous material is excluded rather than included. This is evident in our screen cast video with the voice over because we did not add clip-art or text to the screen. We did not want to overwhelm our viewers so we decided to teach with visual and audio cues.
The personalization principle is the idea that people learn better from a multimedia message when they know the names and characteristics of the main concepts. This is evident because of the prerequisites for this lesson plan. It is required that people already have an Instagram account. By mandating this, we are ensuring that people have heard of Instagram and know its purpose. This foundation ensures optimal learning throughout our lesson.
While explaining the process of posting on Instagram, and going through the process ourselves, the worked example principle is in use. Showing posts on Instagram, as well as the finished product after the step-by-step guide, provides learners with a reference to what they should be aiming for.
When creating different multimedia elements to best educate the learner, we kept the words and pictures close together. Following both of the contiguity principles, we know that people learn better when related words and pictures are closer together rather than apart. In the graphic provided, the text and pictures are very close together, sometimes interacting with the image itself. Keeping the learner engaged and focused on the important information.
Multimedia Lesson Plan: Posting on Instagram
Goal
Learners will be able to navigate Instagram to post pictures. Including minor editing on the post with the use of filters, adding a caption, tagging accounts and adding a location.
Learning Objectives
By the end of the lesson, learner’s will be able to:
- Utilize Instagram’s posting capabilities.
- Navigate the editing section of Instagram to achieve the desirable outcome on the post.
- Add a filter to their photo.
- Crop their photo to suit Instagram’s format.
- Add a caption to their post.
- Include hashtags to their caption.
- Set a location to their post.
- Tag another account on their post.
- Gaining technology and social media experience
Prior Knowledge
- Learners will need to know how to log into and open their Instagram account
- Learners will need to know how to take a picture on their phone
- Learners will need to be able to follow other accounts
Delivery
- Introduction: Introduce Instagram and the key additions to posting a picture.
- Infographic included to go over the steps briefly.
- Pictures of Instagram posts.
- Personal example of posting a memory.
- Opening Instagram and choosing a photo.
- Text instructions.
- Briefly going over necessary prior knowledge.
- Pictures of website/key page.
- Graphic used to exemplify steps.
- Text instructions.
- Adding a caption and location.
- Screen Share video going through the below points.
- Final steps post-photo selection.
- Adding a caption.
- Using hashtags.
- Adding a location.
- Tagging additional accounts.
- Graphic used to exemplify steps.
Structure
Beginning:
“Making a post on Instagram”
Introduction:
- Explain the benefits of social media, specifically Instagram in this case and how networking has become a huge asset to society. Tell a personal story to showcase the importance of networking on social media.
- Paige can explain her personal experience with posting to Instagram on the UVic Vikes women’s soccer account and how it has been a great resource for building the team’s network.
Learning Objective: Explain the overall objective of the lesson, being learning how to make a post on Instagram
Supplies: List supplies needed
Middle:
Creating A New Post:
- Once you’re logged in to your Instagram account on the Instagram app and you’re on your feed
- → to ensure you’re on your feed, look at the bottom left corner and if the house icon is shaded, that indicates you’re currently on your feed.
- Select the box with a plus sign in it, at the top right of the screen. It is the icon that is farthest from the far right side of the screen.
Crafting the Post:
- Now, you can select a photo from your device’s photo library to post or you can choose to take a photo with the camera icon on the bottom right of the photo frame.
- Once you have decided on a photo to post, click “Next” at the top right of the screen.
- Once you have decided on a photo to post, click “Next” at the top right of the screen. This is now the “filter” section, where you can choose to edit your photo. Instagram has many filter options that you can apply to your photo. Filters are presets that change the lighting, highlights, contrast, etc of the photo. Scroll through a select one that enhances your photo!
- On the bottom right of the screen, you can also choose to “edit” your photo. This takes you to a bunch of other editing options, such as “cropping, brightness, contrast, structure, etc.
- After you have edited your photo and decided on how you want it to look, select, “Next” at the top right again.
Method:
- In this last step of crafting your Instagram post, you can select a caption that best describes or relates to your image. You can do this in the large text box that is at the top, to the right of a preview of your image.
- Another feature that you can add is a location. By selecting “Add Location”, you can look up where you would like to tag. This will appear above your photo, and below your username, on the feed.
- Once you have decided on a photo to post, click “Next” at the top right of the screen. Last, you can choose to tag another account. You can do this by selecting the “Tag People” button and looking up the name of the desired account. Once selected, you can move the account name to a desired spot on your photo, or leave it for it to be randomly placed.
End:
- To officially post, hit the “Share” button on the top right of the screen.
- Watch your post upload and hit the feed for your followers to see!
- You can now find this post on your account by selecting the icon of your display picture at the bottom right of the screen
This content will be delivered in a blog post with embedded text, images and videos. Learners will be able to share their own results and make comments on the post.
Content
| Content | Type | Structure | Comments |
| MAKING A POST TO INSTAGRAM | Text & Image of final product | Beginning | Short and engaging beginning that will get the learners interested. |
| INTRODUCTION | Text | Beginning | Discuss how social media networking is valuable in our society today. Tell a personal story to captivate learners. |
| PREREQUISITES AND SUPPLIES | Text & Image | Middle | List all the needed supplies and the prerequisites needed to make these treats. |
| METHOD | Text & Video | Middle | How to create and craft an Instagram post — navigating selecting an image, adding a filter and edits, creating a caption, adding location and tagging other accounts. |
| FINAL PRODUCT | Text & Image of cut up hempies pieces | End | Include how to share and the final product on the feed and on the personal Instagram account. |
Evaluation
- Learners evaluation: learners will submit their original photo, as well as a screenshot/picture of their post.
- Must include the following:
- One filter over the picture.
- A caption.
- At least 1 hashtag.
- Location being used.
- Another account being tagged.
- Feedback will be given based on the included edits/details.
- Must include the following:
- Learner feedback survey.
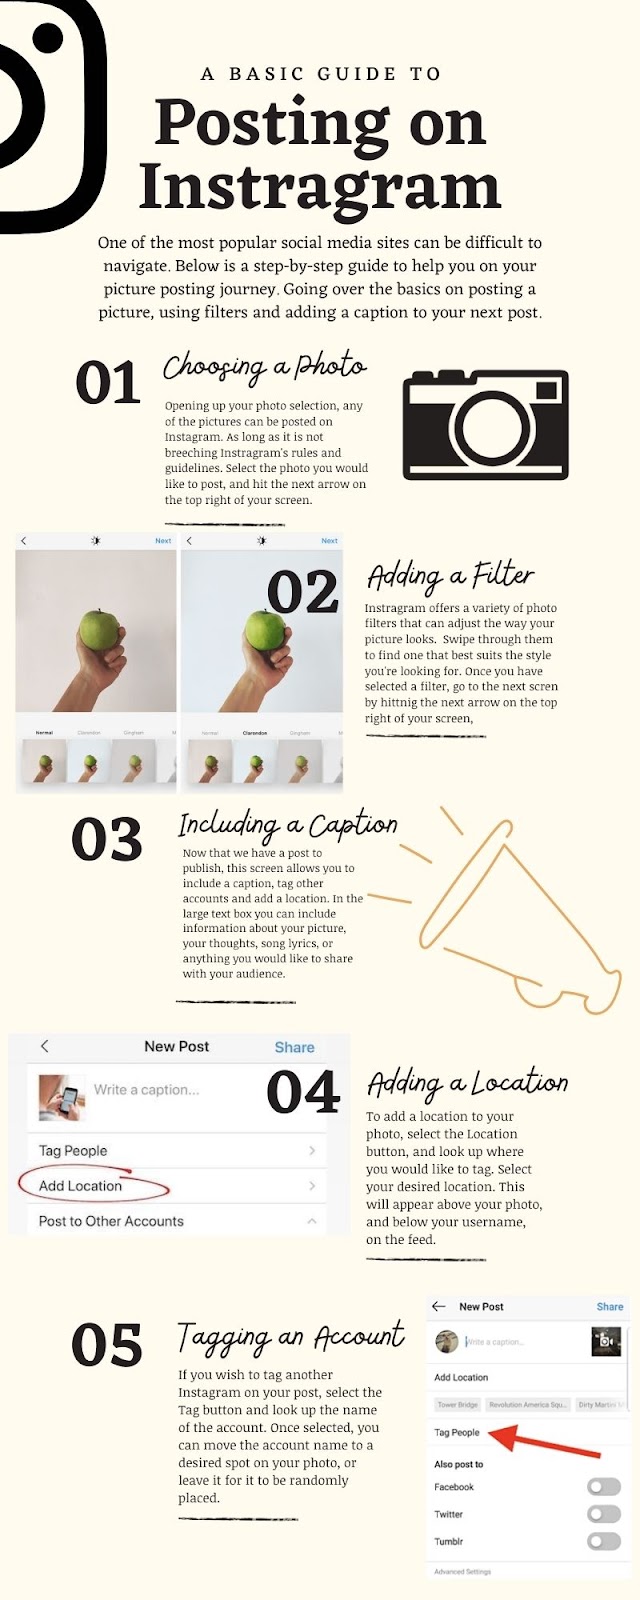
Infographic:
Image created by Ashlyn Mackenzie for the purpose of this project.
Video:
Video and voiceover created by Paige Krivoshien for the purpose of this project.